Pages

Thursday, August 1, 2013

Sticky Toffee Pudding, How I Love Thee

Finally, a moment to blog. Woohoo!

June and July were a tad bit busy, I'd say. Conference planning and executing, family visits, and a spontaneous trip to the UK - that's what we've been up to. And of course we caught a wee cold on the other side of the 10+ hour flight home, so we're recovering, to say the least.


But it's good to be home and so good to be able to share one of our family's most favorite desserts: Sticky Toffee Pudding. The picture isn't great, but believe me, it's yummy! We first met this fine British dish at a Bible study group some 6 years ago. All I knew is that it was rich, delectable, and from Bristol Farms grocery store. Then a few months later, I was watching Food Network, and there was a feature on a Haagen-Dazs "new flavor" competition, where this Asian chick won for her Sticky Toffee Pudding ice cream. Find it, it's amazing...Aw, man. I just looked it up and they say the discontinued the flavor. What?!?

Ok, all the more reason to make this recipe and eat it with vanilla ice cream. You'll know what I mean if you try it.

What is it, you ask? A moist sticky cake that is drenched in toffee sauce. It's sweet, sticky, and toffee-ey. And it's made with dates. Strange, I know. But when you bite into these Medjool dates, it's like biting into brown sugar. No wonder dates are often wrapped in bacon for appetizers. The sweet and salty combo is irresistible.

I got inspired to make this at home (and got the recipe) from Bakerella.com, who got the recipe from Martha Stewart, of course! And, I was surprised at how easy it was. Here we go:

 
Start by chopping up those sticky Medjool dates. I found them at Sprouts, our local grocery that has lots of healthy foods and bins of grains and dried fruits. But if you can't find them, regular dates will work too. After they are chopped, they are a big sticky glob - soak it all in a cup of strong black coffee. Yum. Prep a baking dish by buttering and flouring it.

 
Then we start the batter. Brown sugar, butter, vanilla, eggs, flour, baking powder, baking soda...nothing out of the ordinary. Add the coffee-date mixture, and it's done! Throw it in the oven and while you wait, you make the toffee sauce. Oh yes!


Equal parts brown sugar, heavy cream, and butter. What trio could possibly be better??? You let it melt and boil until it gets thick and syrupy.

 
When the cake is done, and you can get a clean skewer in and out of it, keep poking holes in the surface so that we can get as much sauce soaked in there as possible!


And then, you pour half of the glorious toffee sauce over the cake. It should look like this...
 

It can be left at room temperature until it's ready to be served, then warm it back up in the oven, scoop it up into portions, top it with vanilla ice cream, and pour more toffee sauce on top of that. You cannot go wrong with this dessert. Seriously. Plate-licking will happen.

Next time, I may make them in individual ramekins. You can also use a shallower dish and cut it into squares. Do yourself a favor and make this stuff. It's so good, that we ordered it at every restaurant in England (that had it on the menu). Cheers! To happy pudding-makin'!

Wednesday, May 22, 2013

Two Years and the Baby Brezza

Today marks two years of blogging. I was hoping to make it to 100 posts by now, but I didn't. I was close - just short by 6! The life of working mama is my life right now, and that's okay with me. My son is a sweet reminder to slow down and enjoy the little things, to not get stressed out about checking things off my to-do list.

I must share, however, that my cooking repertoire has now expanded to baby purees. Exciting, huh? The little man is eating solids and his favorites so far are sweet potatoes and apples. No surprise, right? Green beans come in last place, but he has managed to get them down without spitting them out. For those interested, I've been using the Baby Brezza baby food processor (a gift from my Auntie Lucy and grandma). It's worked pretty well, although I think a piece snapped off after the first use and now it won't steam and blend as one sole function anymore. I have to do each step separately (i.e. press two buttons instead of just one).


Though it's not a necessity to make your own baby food, the Baby Brezza is quite convenient and less to clean up. In about 20 minutes, I can steam and puree fresh (or frozen) vegetables or fruits. I've been using ice trays to freeze portions and I have plenty stored up for the weeks ahead. I puree with what I've got. :) Butternut squash saved up from the winter, apples, green beans, avocado, sweet potato, carrots...next up - bananas, peas, and peaches!

Bon appetit, from Mr. Jake!


Wednesday, May 8, 2013

Muffalettas & Mojitos

My poor neglected blog. It may seem like it's on its last leg. I hope not. I feel like I'm being stretched to fulfill a number of needs these days. Ok, it's not just a feeling, it's my reality. Husband. Baby. Cats. House. Job. Family. Friends. And somewhere out there, you blog readers. How some of you have multiple children and an active blog is beyond me. All that to say, here I am.

So this post. It's two-in-one. I didn't serve these two things together, but alliteration is lovely, so I'm making it work. Muffalettas and mojitos. Strawberry mojitos.

Here's the scoop on the muffaletta:


It's a sandwich, made famous in New Orleans, Louisiana. It's made with Italian ingredients, but served all over Cajun country. It's a part of our family food history because my parents have journeyed to New Orleans every year since I was a little girl and there hasn't been a trip to NOLA without a muffaletta from Central Grocery.

On one of their last trips, they brought us back a jar of Central Grocery's olive salad, which makes this sandwich unique. Marinated olives in olive oil and herbs, with bits of carrot and cauliflower, this salad is good between any two pieces of bread. It's the key to the muffaletta. And you can general find some version of it in any Italian deli or market. Add a quarter-pound each of thinly sliced provolone cheese, Genoa salami, capicola, smoked ham, and mortadella onto a large loaf of Italian bread (something like Ciabatta works well), and you have yourself a New Orleans classic. You can really use any Italian cold cuts that you like, but the salami, ham, and mortadella are pretty standard.

 
Yes, that's a lot of meat and cheese. But this sandwich is big and is meant to feed a lot of people. Or one REALLY hungry giant.

So, how do you make it?

1. Cut the loaf of bread in half (top and bottom).
2. Generously spoon on the olive salad onto the top half of the bread. Let that olive oil soak in.
3. Put a little more of the olive oil on the bottom half of the bread.
4. Layer on the meats and cheese on the bottom bread half.
5. Very carefully put the two halves together. Olives will fall out. Stuff them back in.
6. Cut into portions.
7. Share with friends.
8. Wipe the oil off your hands with lots of paper napkins (don't use cloth napkins - oil stains!).

And a cocktail:

My hubby made this for me after a long day of working and mothering. We had mint and strawberries in our CSA box. It was a cocktail meant to be. It was fantastic, refreshing, and just what I needed. He's sharing his recipe with you here!

Strawberry Mojito
1.5 oz. White rum
1/4 Lemon, juiced
1 T Agave nectar
2 sprigs of fresh mint leaves
1 sliced strawberry
Club Soda

Muddle strawberry, mint, agave, and lemon juice in a highball. Add ice, white rum, and top off with soda water. Garnish with mint sprig and strawberry. Enjoy!

Sunday, March 17, 2013

For St. Patrick's Day: Cottage Pie

I love pub food. Bangers and mash. Guiness stew. Fish n' chips. Beer. Bring it on!


In honor of St. Patrick's Day, a holiday named for a very noble man, who brought Christianity to Ireland, I'll share a recipe for cottage pie, since potatoes seem very Irish, and it's likely you could find cottage pie on a menu in Ireland, if not somewhere in the Bristish Isles. I ramble. Is that a long enough run-on sentence?

And for those of you wondering (not that you are, but I'll tell you anyway), tonight my family will be dining on corned beef and cabbage - the official Irish American meal of the day. It's in the crock pot as I type. It's tradition here in our household, just as it was when I was growing up in my Chinese American home. We love us some multicultural meals. :)

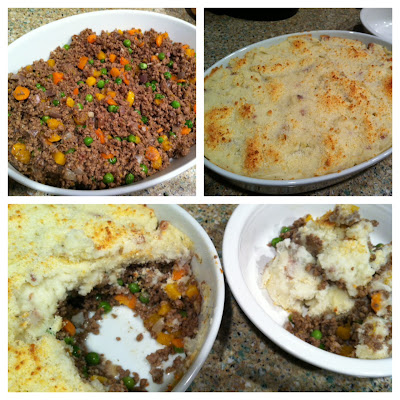
Back to the cottage pie. So, many people know Shepherd's Pie - ground lamb with onions, carrots, and peas topped with cheesy mashed potatoes and baked in the oven. Well, cottage pie is the same idea, just using beef instead of lamb.


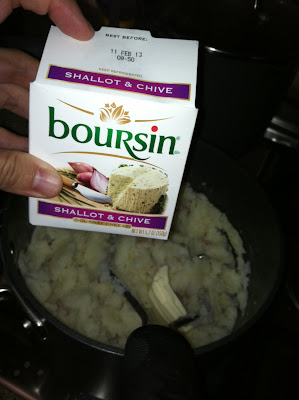
I had potatoes, garlic, ground beef, half a red onion, peas, carrots, and well...I had butternut squash. "Loads" of it, as my British friends would say. If you didn't know, butternut squash is the same color as carrots. They made great addtion in this recipe. It worked. I also had some Boursin cheese to use. And it's creamy enough to incorporate into mashed potatoes to make it special. Mmm.


So, that brings me to the first step. Mashed potatoes. Make them however you make them. I stick the cut up potatoes (about 5 red potatoes or 3 russets) into salted water and bring them to a boil, letting them simmer until the potatoes are fork-tender. Drain the water off and use a masher until the taters are smooth, adding a tablespoon of butter, about 1/2 cup of milk, and some Boursin cheese for extra flavor. Set them aside for later.


Next, the beef. Brown the meat until fully cooked. Use a slotted spoon to remove the meat from the pan and set it aside while you cook the vegetables in the same pot. You can either pour off the grease (if it's a lot, you definitely want to get rid of the extra fat) or use it to cook your veggies. I confess, I used it to cook. It was a little fatty, but it tasted good! Throw in a couple of cloves of minced garlic, onions, and the carrots and squash to brown.

I then added about 1/2 teaspoon each of ground sage and thyme. And salt and pepper to taste. I added the cooked meat back into the pot, threw in about 4-6 good dashes of Worcestershire sauce, and about 1/2 cup of frozen green peas.


After the peas were incorporated, I poured the whole thing into a casserole dish, topped it with the mashed potatoes, and sprinkled the whole dish with grated parmesan cheese. I baked it in a 350 degree oven for about 30-40 minutes, or until the top was golden brown and it was heated all the way through. It made enough for about 5-6 servings.

It's so delicious and easy. And it's a great way to use up those veggies! Happy cookin' and happy St. Paddy's Day. Stay safe!

Sunday, February 17, 2013

She's Cookin' Again

So, maybe it's been three months....aaaand more than a few days on top of that. I've missed you. And I see that I've gotten a few hits here and there since I've been gone, so maybe you missed me too. :)

This little guy has stolen my heart and my spare time. But I wouldn't trade it. He's pretty fun to hang out with. And, as you can tell, he likes to eat just like his mama.


If you've wondered, I have been cooking. It's less frequent than before, but I still find immense joy in the kitchen. It's life-giving. Especially when I feel sucked dry. Literally. Too much information?

I'm starting small on this post, but I have more up my sleeve. Not to worry. I am back. Maybe not as often, but I will be posting new stuff soon.

For now, I finally got around to making kale chips!

These have been around for a while. In fact, they are even selling them in bags at the grocery store now. For some reason I was always afraid of messing them up, so I didn't try it. But it's really not that difficult. I've been missing out.


They are crispy and flaky-like and addicting! I haven't figured out how to store them well, though. I tried to save them in a Ziploc bag and they got sort of chewy. Not the consistency you want in a chip. But, straight out of the oven, they are yummy. You should just eat them all in one go.

Here's how I did it:
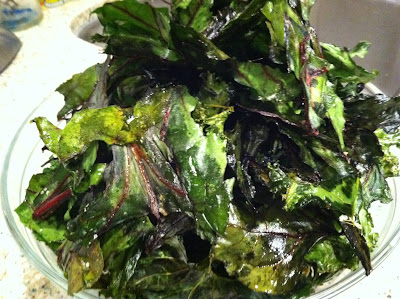
I used one bunch of kale and one bunch of beet green leaves. They were washed and spun dry in a salad spinner, then dabbed even drier with paper towels, and torn into chip-sized pieces. Be sure they are really dry. Preheat your oven to 275F.

Lay the greens on a foil-lined cookie sheet in one layer. Drizzle about 2 tablespoons of olive oil over the greens with a few pinches of kosher salt. Toss well so that all the leaves are coated. Bake for 25 minutes.

Let rest a few minutes. Enjoy with a friend or two.

Stay tuned for more fun recipes and food adventures. Happy cookin'!

Sunday, November 11, 2012

Mexican Wedding Cookies With A Little Fall Flavor


Pumpkin spice lattes. Pumpkin bread. Pumpkin spice coffee creamer, yogurt, cereal bars, granola...'tis the season for pumpkin...stuff. And, I love it. My favorite is probably just plain old pumpkin pie, but I must admit, Trader Joe's Pumpkin Ice Cream has my heart this year too.

You can imagine then, how excited I was when I saw {this recipe} on Cookie + Kate's website. Well, maybe I should have told you how I really like things covered in powdered sugar or cinnamon and sugar. Like donuts. Mmm. I'm getting off track...

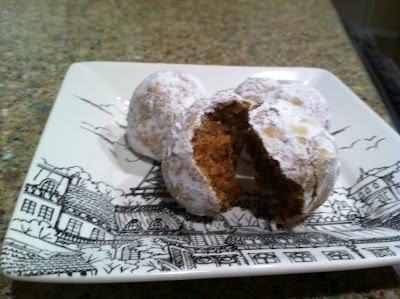
Anyway, I found this recipe on a Thursday and I was determined to make them over that weekend. I thought I had run out of pecans, but I decided to do one last search through my pantry, and sure enough, I found a bag of glazed pecans (meant to top a salad). I knew I had some pumpkin puree from a fresh pumpkin in the freezer, and just enough whole wheat pastry flour (one of my staples) for one batch.


The dough is a little sticky, but forms perfect little 1.5 inch balls, which don't spread when baking, so you can place them pretty close together on a baking sheet.


After they bake, let them cool for 5 minutes, then while they are still warm, but cool enough to handle, you roll them in powdered sugar. Mmmm.


They need to cool for another 10-15 minutes, then you can serve them or store them for a couple of days. They are best either on the day-of or the day after. If you wait too long, the sugar may evaporate depending on how moist the air is.


These were easy to make and a great autumn twist on a classic treat. Perfect with a cup of coffee or tea, pumpkin spiced, of course!

This week, my son will be born (he's already 3 days late today) - my doctor has given us an induction date...we are so excited to meet our little one. My guess is that I will be away from blogland for a few weeks, so I will wish you a blessed Thanksgiving and start to the holiday season now. Don't forget to keep cookin' with whatcha got!

xoxo,
Lea

Saturday, November 3, 2012

Prepping for Baby - Freezer Burritos

Our baby is due in 5 days. He doesn't seem too concerned about time. He's comfortable and kicking away at my ribs...and at this rate, he'll be baking in there so long, I'm sure he will be a tall baby, even though I'm just over 5 feet tall myself.
 
I've been trying to use my waiting time wisely. I thought it would be smart to have some ready-to-eat food in the freezer for the days when we don't have time for more than a microwaved, one-hand-held meal. I had seen this idea on a facebook friend's page: homemade frozen burritos!


I had some rotisserie chicken left over as well as some pulled pork in the freezer. I bought a package of whole wheat tortillas, some taco seasoning, olives, shredded cheese, and green chiles. I had a can of refried beans in my pantry.

 
I warmed up the tortillas in the microwave to make them pliable enough to fold up.


I mixed a little bit of taco seasoning into the two different types of meats. I topped the meat with a little bit of beans, olives, chiles, and cheese.

 In the pork burritos, I also added some of my Mexican pickled carrots.

 
After I had used all of the meat, I had 8 burritos. I wrapped them individually in plastic wrap, then put all eight burritos in a resealable freezer bag. Now I've got a quick meal that only needs to be thrown in the microwave for a few minutes! This nesting thing is kind of fun!